Support our educational content for free when you buy through links on our site. Learn more
Maker Spaces and Hands-On Learning: 7 Classroom Strategies

As an Amazon Associate, we earn from qualifying purchases.
The most effective way to transform your classroom is to stop waiting for a perfect room and start implementing iterative, low-floor, high-ceiling projects that prioritize the design process over the final product. By adopting these strategies for incorporating maker spaces and hands-on learning activities, you can turn every corner into a laboratory of innovation without needing a massive budget or a full curriculum overhaul.
Imagine a quiet student who struggles with traditional essays suddenly becoming the lead engineer on a team building a Rube Goldberg machine. This isn’t a fantasy; it’s the reality in classrooms that embrace the maker mindset. Research from the University of Pennsylvania suggests that students engaged in hands-on, project-based learning show significantly higher retention rates and deeper conceptual understanding compared to those in passive lecture settings.
You might be wondering how to fit this into an already packed schedule. The secret lies integration, not addition. Instead of carving out a separate “maker hour,” you weave these activities directly into your existing math, science, or literacy lessons, turning abstract concepts into tangible challenges.
Curiosity Spark: Have you ever noticed how the most reluctant writers become prolific storytellers when they have to script a puppet show or design a comic strip? We’ll uncover exactly how to leverage that specific magic later in this guide.
Key Takeaways
- Start Small and Mobile: You don’t need a dedicated room; a Tinker Cart or a “Maker in a Box” is enough to launch a culture of innovation.
- Embrace Failure as Data: Shift the classroom culture so that failed prototypes are celebrated as essential steps in the learning process.
- Focus on Process, Not Product: Assess students on their iteration, collaboration, and reflection rather than just the functionality of their final creation.
- Integrate, Don’t Add: Embed maker challenges directly into existing curriculum standards to maximize instructional time.
- Balance Analog and Digital: Use simple materials like cardboard and tape alongside tech tools to ensure accessibility and foster creativity.
Table of Contents
- ⚡️ Quick Tips and Facts
- 🏗️ From Garage Tinkers to Classroom Innovators: A Brief History of the Maker Movement
- 🧠 Why Hands-On Learning Actually Works: The Science Behind the Spark
- 🛠️ 7 Essential Strategies for Incorporating Maker Spaces and Hands-On Activities
- 1. Start Small: Transforming a Corner into a Creative Hub
- 2. Curating the Ultimate Toolkit: From Hot Glue to 3D Printers
- 3. Designing Challenges That Make Students Think (and Sweat)
- 4. Integrating STEAM: Blending Art with Engineering and Math
- 5. Fostering a Culture of Failure: Embracing the “Oops” Moment
- 6. Collaborative Projects: Building Together, Learning Together
- 7. Assessing the Unassessable: Measuring Growth in Maker Spaces
- 🏫 Setting Up Your Physical Space: Layout, Safety, and Flow
- 💻 Digital vs. Analog: Choosing the Right Tech for Your Maker Space
- 👩 🏫 Teacher Roles: From Lecturer to Facilitator and Co-Learner
- 📚 Real-World Success Stories: How Schools Are Winning with Makerspaces
- 💰 Budgeting Hacks: Building a Maker Space Without Breaking the Bank
- 🚧 Overcoming Common Hurdles: Time, Space, and Administrative Pushback
- 🎨 Quick Tips and Facts: The Maker Mindset in a Nutshell
- 🏁 Conclusion
- 🔗 Recommended Links
- ❓ FAQ
- 📖 Reference Links
⚡️ Quick Tips and Facts
Before we dive into the nitty-gritty of sawdust, soldering irons, and the occasional burnt hot glue stick, let’s hit the ground running with some high-impact truths about maker spaces. If you’re thinking this is just a fancy name for “arts and crafts,” think again.
- It’s Not About the Tool, It’s About the Thought: A student can build a magnificent cardboard castle, but the real magic happens when they explain why the tower didn’t fall over. The iterative design process is where the learning lives.
- Failure is a Feature, Not a Bug: In a traditional classroom, a red “F” is the end of the road. In a maker space, a collapsed bridge is just data. It’s the first step toward the second, better attempt.
- Cross-Curicular Goldmine: You don’t need a separate “science period” to do engineering. Building a ramp for a toy car teaches physics, math (angles and velocity), and even storytelling if the car has a mission.
- The “Low Floor, High Ceiling” Rule: Great maker activities are easy to start (low floor) but can get incredibly complex (high ceiling). This ensures your reluctant learner and your future engineer are both engaged.
- Assessment is Different: You can’t grade a project solely on the final product. You must assess the process, the collaboration, and the reflection.
Pro Tip from the Teacher Strategies™ Team: We once had a principal walk in during a “disaster” where a group of 5th graders had accidentally glued their hands to a table. Instead of panicking, the teacher asked, “Okay, what’s our plan to get unstuck without hurting anyone?” That moment of problem-solving under pressure was worth more than any worksheet.
For a deeper dive into how these strategies align with broader educational goals, check out our guide on Teacher Strategies.
🏗️ From Garage Tinkers to Classroom Innovators: A Brief History of the Maker Movement
You might think the maker movement is a 21st-century phenomenon born from the silicon valley of the mind, but we’ve been doing this forever. The roots of hands-on learning stretch back to the apprenticeship models of the Middle Ages, where learning happened by doing, not just listening.
Fast forward to the 1970s and 80s, and you see the rise of personal computing and the “hacker” culture in garages. People like Steve Jobs and Steve Wozniak weren’t just reading manuals; they were soldering circuits and tweaking code. This spirit of DIY (Do It Yourself) eventually bled into education, but it took a while to get there.
The term “Maker Movement” really gained traction in the mid-20s with the launch of Make magazine and the first Maker Faire in 206. Suddenly, tinkers had a community. Schools began to take notice. The shift wasn’t just about adding a 3D printer to the library; it was a pedagogical shift from passive consumption to active creation.
- The Shift: From “Here is the answer” to “Here is the problem; how do you solve it?”
- The Philosophy: Constructionism, a learning theory developed by Seymour Papert, posits that people learn best when they are constructing a public entity, whether it’s a sandcastle or a robot.
- The Evolution: We moved from simple crafts to STEAM (Science, Technology, Engineering, Arts, and Mathematics), integrating coding, electronics, and advanced fabrication.
As noted by experts at Edutopia, the movement is about “enabling curiosity to take root and knowledge to grow.” It’s about creating learning landscapes where students aren’t just filling in bubbles on a scantron; they are building the world they want to live in.
🧠 Why Hands-On Learning Actually Works: The Science Behind the Spark
Why does a kid remember how to build a circuit better than they remember the definition of “voltage” from a textbook? It’s not magic; it’s neuroscience.
When students engage in hands-on activities, they are activating multiple areas of the brain simultaneously. This is often called multimodal learning.
- Kinesthetic Engagement: Moving your hands and body creates stronger neural pathways than just sitting still.
- Emotional Connection: The frustration of a failed attempt and the euphoria of success release dopamine, which cements the memory.
- Contextual Learning: Abstract concepts become concrete. You don’t just know what a gear ratio is; you feel it when your robot moves too fast or too slow.
The “Desirable Difficulty” Factor
Educational psychologists talk about desirable difficulty. If a task is too easy, no learning happens. If it’s too hard, the student shuts down. Maker spaces hit that sweet spot. The challenge is real, the stakes are low (it’s just cardboard, after all), and the feedback is immediate.
Curiosity Check: Have you ever noticed how students who struggle with traditional writing suddenly become prolific storytellers when they have to write a script for a puppet show? We’ll explore that specific intersection of writing and making later in this article.
🛠️ 7 Essential Strategies for Incorporating Maker Spaces and Hands-On Activities
Ready to stop dreaming and start building? Here are seven battle-tested strategies to turn your classroom (or a corner of it) into a hub of innovation. These aren’t just ideas; they are the blueprint we use at Teacher Strategies™.
1. Start Small: Transforming a Corner into a Creative Hub
You don’t need a dedicated room with industrial 3D printers to start. In fact, starting small is often the best way to avoid burnout.
- The “Tinker Cart”: Get a rolling cart stocked with basic supplies (cardboard, tape, scissors, markers). Roll it into your room when you need it, and roll it out when you’re done.
- The “Makerspace in a Box”: Create themed kits for specific projects. One box might be for “Bridge Building,” another for “Circuitry.”
- Why it works: It lowers the barrier to entry. If the space is permanent and intimidating, students might be afraid touch it. A mobile space says, “Let’s play!”
2. Curating the Ultimate Toolkit: From Hot Glue to 3D Printers
What do you actually need? The answer is: not everything.
- The Basics (The “Low-Tech” Essentials): Cardboard, duct tape, hot glue guns (with safety guards), scissors, markers, string, and recycled materials (bottles, tubes).
- The “Mid-Tech” Add-ons: Simple circuits (batteries, wires, LEDs), Makey Makey kits, and basic hand tools (screwdrivers, pliers).
- The “High-Tech” Dream: 3D printers, laser cuters, and robotics kits like LEGO Mindstorms or VEX.
Pro Tip: Don’t buy the most expensive 3D printer on the market immediately. Start with a reliable workhorse like the Creality Ender 3 or a Prusa i3. They are robust, have huge community support, and are forgiving for beginners.
| Tool Category | Recommended Brands/Items | Best For |
|---|---|---|
| Basic Construction | Duct Tape, Cardboard, Hot Glue | Protyping, structural integrity |
| Electronics | Makey Makey, Snap Circuits | Intro to circuits, interactive art |
| Coding/Robotics | LEGO Education SPIKE, Micro:bit | Logic, sequencing, engineering |
| 3D Printing | Creality, Prusa, Ultimaker | Precision, complex geometry |
| Cuting/Shaping | X-Acto knives, Foam core, Laser Cuters | Detail work, fabrication |
👉 Shop Makey Makey on: Amazon | Official Website
👉 Shop LEGO Education on: Amazon | Official Website
3. Designing Challenges That Make Students Think (and Sweat)
A maker space without a challenge is just a playroom. You need open-ended prompts that have multiple solutions.
- The “Egg Drop” Classic: Protect an egg from a 10-foot drop using only straws and tape. Simple? Yes. Impossible to solve perfectly on the first try? Absolutely.
- Real-World Problems: “Design a device to help someone with limited mobility open a door.” This connects empathy with engineering.
- The “Constraint” Method: Limit the materials. “Build a tower using only 10 sheets of paper and 1 foot of tape.” Constraints force creativity.
4. Integrating STEAM: Blending Art with Engineering and Math
The “A” in STEAM is crucial. Without art, engineering is just math. Without engineering, art is just decoration.
- Math in Action: Measuring angles for a ramp, calculating the volume of a container, or scaling a blueprint.
- Science in Action: Testing materials for strength, understanding electricity, or exploring aerodynamics.
- Art in Action: Designing the aesthetic of a robot, creating a narrative for a project, or using color theory in a circuit board.
Teacher Story: We had a student who hated math. He couldn’t solve for “x” to save his life. But when we asked him to build a Rube Goldberg machine that would pop a balloon, he was calculating trajectories, timing, and leverage without even realizing he was doing algebra. The math became a tool, not a test.
5. Fostering a Culture of Failure: Embracing the “Oops” Moment
This is the hardest part for many teachers. We are trained to correct errors. In a maker space, errors are the curriculum.
- The “Failure Resume”: Have students write down what didn’t work and what they learned from it.
- Model Vulnerability: When you mess up a project, say it out loud. “Wow, I glued that wrong. Let’s see how we can fix it.”
- Celebrate the “First Draft”: Display the “ugly” prototypes alongside the final products.
6. Collaborative Projects: Building Together, Learning Together
Maker spaces are inherently social. Use this to your advantage.
- Role Rotation: Assign roles like “Project Manager,” “Materials Specialist,” “Lead Engineer,” and “Documentation Officer.” Rotate these roles so everyone gets a turn.
- Peer Teaching: Let students who master a skill (like soldering) teach their peers. It reinforces their own understanding and builds community.
- Cross-Age Mentoring: Older students can mentor younger ones, creating a culture of collaborative learning.
7. Assessing the Unassessable: Measuring Growth in Maker Spaces
How do you grade a robot that doesn’t work? You don’t grade the robot; you grade the process.
- Rubrics for Process: Create rubrics that assess planning, iteration, collaboration, and reflection, not just the final product.
- Portfolios: Have students document their journey with photos, videos, and journals.
- Presentations: Let students present their work to the class, explaining their design choices and what they would do differently next time.
For more on how to assess these unique skills, explore our resources on Assessment Techniques.
🏫 Setting Up Your Physical Space: Layout, Safety, and Flow
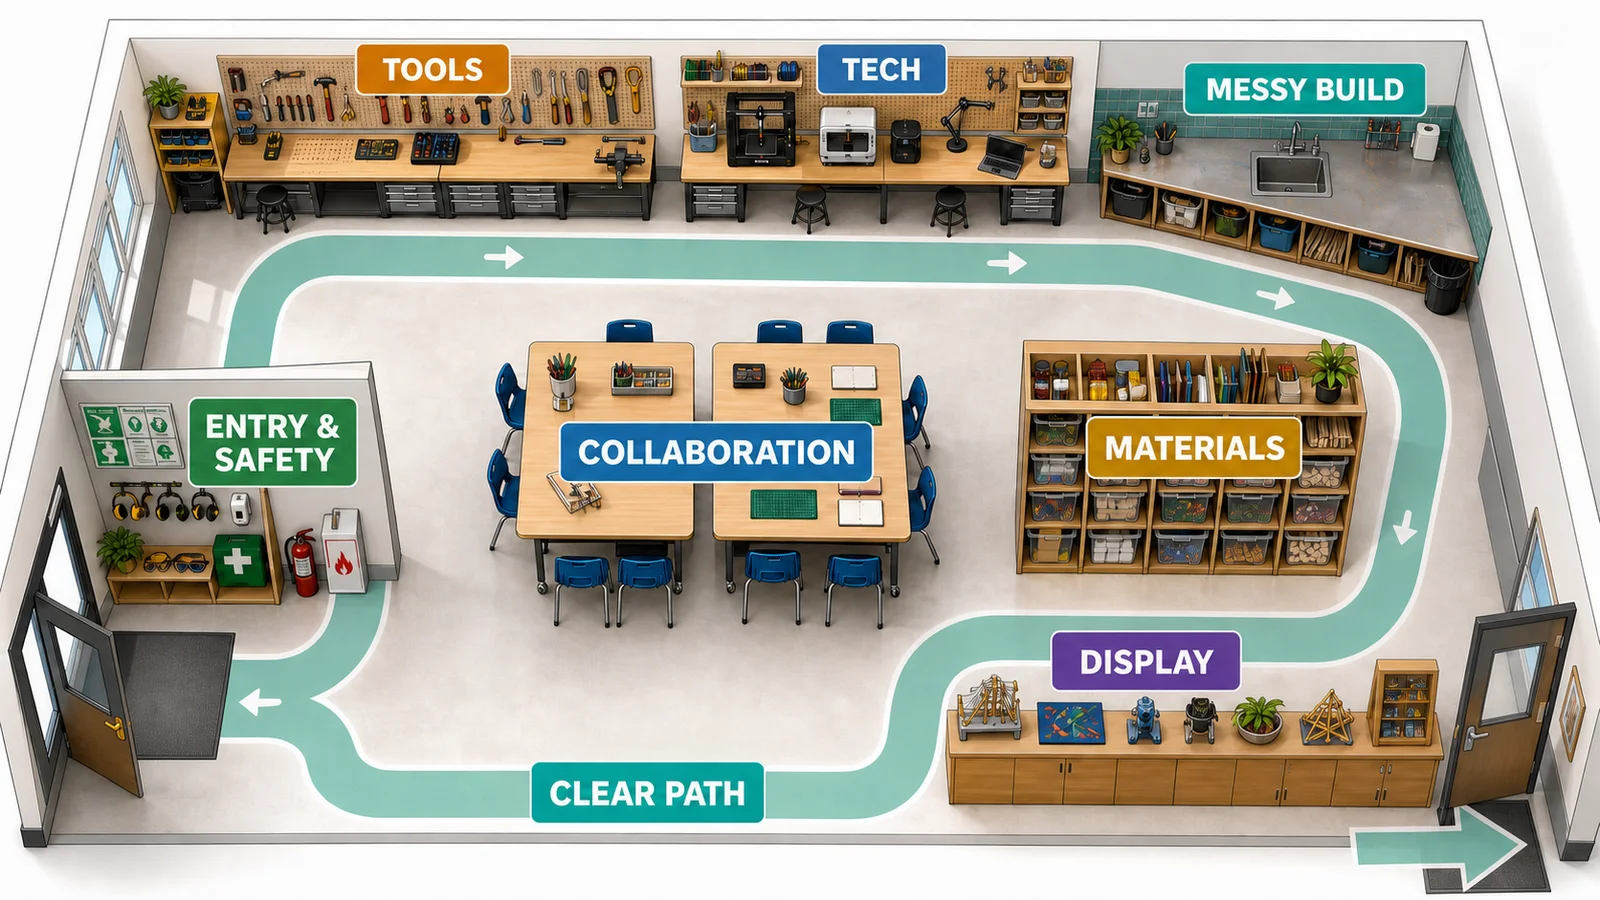
You have the strategies; now you need the stage. The physical layout of your maker space dictates how students interact with the materials and each other.
Zoning Your Space
Think of your space like a restaurant kitchen. You need distinct zones for different activities:
- The “Dirty” Zone: Where the sawing, gluing, and painting happen. This needs to be near a sink and have easy-to-clean surfaces.
- The “Clean” Zone: Where electronics, 3D printers, and computers live. Keep this away from sawdust and glue fumes.
- The “Thinking” Zone: A quiet area with tables and chairs for planning, sketching, and reflection.
- The “Storage” Zone: Clearly labeled bins for materials. If it’s not labeled, it won’t get put back.
Safety First (But Don’t Be a Scroge)
Safety is non-negotiable, but it shouldn’t kill the vibe.
- PE (Personal Protective Equipment): Goggles, gloves, and aprons should be as accessible as the materials.
- Tool Training: No student touches a power tool until they pass a safety certification (even if it’s just a quick quiz and demonstration).
- Clear Pathways: Ensure there are no tripping hazards. Cables should be taped down or managed with cable ties.
Curiosity Check: How do you manage a room full of excited 10-year-olds with hot glue guns? We’ll reveal our classroom management secrets in the next section.
💻 Digital vs. Analog: Choosing the Right Tech for Your Maker Space
There is a common misconception that a maker space must be high-tech. Wrong. The best maker spaces balance analog and digital tools.
The Analog Advantage
- Accessibility: Cardboard and tape are cheap and available everywhere.
- Tactile Feedback: Students can feel the texture, weight, and balance of their creations.
- Speed: You can prototype an idea in 5 minutes with analog materials.
The Digital Edge
- Precision: 3D printers and laser cuters allow for complex geometries impossible with hands.
- Iteration: You can tweak a design in software and reprint it instantly.
- Future Skills: Coding and digital fabrication are essential skills for the modern workforce.
The Hybrid Approach: Start with analog prototype (cardboard), test it, refine it, and then move to digital fabrication if needed. This teaches students that technology is a tool, not a crutch.
👩 🏫 Teacher Roles: From Lecturer to Facilitator and Co-Learner
In a maker space, you are no longer the sage on the stage. You are the guide on the side.
- The Facilitator: Your job is to ask questions, not give answers. “What have you tried?” “What do you think is causing that?” “How could you test that hypothesis?”
- The Co-Learner: It’s okay to say, “I don’t know how to fix that 3D printer. Let’s figure it out together.” This models lifelong learning.
- The Resource Manager: You help students find the materials and information they need, but you don’t hand it to them on a silver platter.
This shift can be uncomfortable. You might feel like you’re not “teaching” if you aren’t lecturing. But remember, active learning is happening when the students are struggling and solving problems.
For more on shifting your teaching style, check out our articles on Differentiated Instruction and Collaborative Learning.
📚 Real-World Success Stories: How Schools Are Winning with Makerspaces
Let’s look at some real-world examples of schools that have nailed the maker space integration.
- Albemarle County Public Schools (Virginia): This district is famous for its “maker mindset.” They don’t have a single “maker room”; instead, they have maker carts in every classroom. Students are encouraged to bring their own projects and use the school’s resources to build them. The result? A culture where student autonomy is the norm.
- The Ellis School (Pennsylvania): This all-girls school uses maker spaces to empower female students in STEM. They focus on design thinking and solving community problems, showing girls that engineering is for everyone.
- A High School in California: One teacher transformed a neglected storage closet into a “hackerspace” using donated materials. Students built a robotic arm that could sort recycling, which was then installed in the school cafeteria. The project started with a simple question: “How can we make our school grener?”
These stories prove that you don’t need a million-dollar budget to make a million-dollar impact. It’s about vision and community.
💰 Budgeting Hacks: Building a Maker Space Without Breaking the Bank
Let’s be real: most schools don’t have a grant for a new 3D printer. Here’s how to build a maker space on a shoestring budget.
- The “Trash to Treasure” Program: Partner with local businesses (grocery stores, offices, construction sites) to collect cardboard, scrap wood, and electronic waste.
- Crowdfunding: Platforms like DonorsChoose are goldmines for teacher funding. Be specific in your request: “We need 50 feet of wire and 20 LEDs to build circuits.”
- Community Partnerships: Local makers, engineers, and retirees often have tools and skills they are willing to share. Host a “Community Build Day.”
- DIY Tools: You can build a simple 3D printer or a laser cutter using open-source designs and cheap parts.
- Repurpose Old Tech: Don’t throw away old computers or tablets. They can be used for coding, design, and documentation.
👉 Shop Recycled Materials on: Etsy | Walmart
🚧 Overcoming Common Hurdles: Time, Space, and Administrative Pushback
You’ve got the plan, but you’re facing resistance. Here’s how to tackle the big three hurdles.
1. “We Don’t Have Time!”
- The Fix: Integrate maker activities into existing lessons. Don’t add more to the day; transform the day. A 45-minute lesson on geometry can become a 45-minute session on building geometric shapes.
- The Argument: Show administrators the data. Students who engage in hands-on learning often show higher retention rates and better problem-solving skills.
2. “We Don’t Have Space!”
- The Fix: Use the “Tinker Cart” strategy. If you can’t have a room, have a cart. If you can’t have a cart, have a box.
- The Argument: Maker spaces don’t need to be permanent. They can be mobile and flexible.
3. “It’s Too Messy/Chaotic!”
- The Fix: Establish clear routines and expectations. Use a “clean-up song” or a timer. Teach students how to organize materials.
- The Argument: A little chaos is a sign of engagement. As long as it’s safe and purposeful, it’s okay.
For more on managing the chaos, read our guide on Classroom Management.
🎨 Quick Tips and Facts: The Maker Mindset in a Nutshell
Let’s recap the core principles of the maker mindset before we wrap up.
- Iterate, Iterate, Iterate: The first version is never the best version.
- Share and Collaborate: Knowledge grows when you share it.
- Embrace Failure: It’s just a step toward success.
- Be Curious: Ask “What if?” and “Why not?”
- Document Everything: Keep a journal of your process.
Final Thought: Remember the student who couldn’t solve for “x”? He built a robot that could. That’s the power of the maker mindset. It’s not about the robot; it’s about the confidence to tackle any problem.
🏁 Conclusion
We’ve journeyed from the garages of the 1970s to the bustling maker spaces of today, exploring seven essential strategies to bring hands-on learning into your classroom. We’ve seen how a simple cardboard box can spark a revolution in critical thinking, and how a “failure” can be the most valuable lesson of the day.
The question we posed at the beginning—how do we move from passive consumers to active creators?—has a clear answer: Start small, embrace the mess, and trust the process.
You don’t need a million-dollar budget or a dedicated room. You need a vision, a willingness to let go of control, and a belief that your students are capable of incredible things. Whether you’re building a simple circuit or a complex robot, the goal is the same: to ignite a spark of curiosity that lasts a lifetime.
So, what are you waiting for? Grab some cardboard, fire up the hot glue gun, and let’s make something amazing.
🔗 Recommended Links
Ready to get started? Here are some of our top picks for tools, books, and resources to jumpstart your maker space.
Essential Tools & Kits:
- Makey Makey: Amazon | Official Website
- LEGO Education SPIKE Prime: Amazon | Official Website
- Micro:bit: Amazon | Official Website
- 3D Printer (Creality Ender 3): Amazon | Official Website
Must-Read Books:
- “Invent to Learn: Making, Tinkering, and Engineering in the Classroom” by Gary Stager and Sylvia Martinez: Amazon
- “The Maker Movement Manifesto” by Mark Hatch: Amazon
- “Designing for Learning: Creating a Maker Space in Your School” by Lisa M. H. Smith: Amazon
Online Resources:
- MakerEd Resource Library: MakerEd
- Edutopia Maker Education: Edutopia
- Instructables: Instructables
❓ FAQ

How can teachers effectively integrate maker spaces into existing curriculum standards?
Integrating maker spaces doesn’t mean abandoning your curriculum; it means reimagining it. Start by identifying the core standards you need to cover (e.g., NGSS for science, Common Core for math). Then, design a project that naturally incorporates those standards. For example, if you need to teach fractions, have students build a scale model of a house where every measurement must be in fractions. The key is to make the standard the tool for the project, not the end goal.
What are the best low-cost materials for starting a classroom maker space?
You don’t need expensive tech to start. The best low-cost materials are:
- Cardboard: Boxes, tubes, and sheets.
- Duct Tape and Hot Glue: The ultimate adhesives.
- Recycled Materials: Plastic bottles, egg cartons, and old electronics.
- Basic Hand Tools: Scissors, rulers, and markers.
- Simple Circuits: Batteries, wires, and LEDs (often available in bulk for pennies each).
How do you assess student learning in hands-on maker space activities?
Assessment in maker spaces should focus on the process, not just the product. Use rubrics that evaluate:
- Planning and Design: Did the student create a clear plan?
- Iteration: Did they try multiple solutions?
- Collaboration: Did they work well with others?
- Reflection: Can they explain what they learned and what they would do differently?
- Documentation: Did they keep a journal or portfolio of their work?
Read more about “🚀 7 Inquiry-Based Learning Strategies to Ignite Curiosity (2026)”
What safety protocols should be implemented in a school maker space?
Safety is paramount. Implement these protocols:
- PE: Require goggles, gloves, and aprons for specific activities.
- Tool Training: No student uses a power tool without passing a safety test.
- Clear Zones: Designate specific areas for “dirty” and “clean” work.
- Supervision: Always have an adult present when using power tools or hot glue.
- Emergency Procedures: Ensure everyone knows where the first aid kit and fire extinguisher are.
How can maker spaces support differentiated instruction for diverse learners?
Maker spaces are naturally differentiated. Students can choose projects that match their interests and skill levels.
- Visual Learners: Can sketch and build models.
- Kinesthetic Learners: Can manipulate materials and tools.
- Auditory Learners: Can explain their process and collaborate.
- Neurodiverse Students: Often thrive in maker spaces because the hands-on nature allows for nonlinear thinking and self-paced exploration.
Read more about “How Can Teachers Support Students with Special Needs? 12 Proven Ways 🎓”
What are common challenges in managing a maker space and how to overcome them?
- Challenge: “It’s too messy.”
Solution: Establish clear clean-up routines and use labeled bins. - Challenge: “Students get distracted.”
Solution: Use timers and clear project goals. - Challenge: “I don’t have enough time.”
Solution: Integrate maker activities into existing lessons rather than adding them on. - Challenge: “Students get frustrated.”
Solution: Teach the value of failure and provide scaffolding for difficult tasks.
Read more about “🚀 12 Proven Strategies to Differentiate Instruction for Every Student (2026)”
How does hands-on learning in maker spaces improve student engagement and retention?
Hands-on learning improves engagement by making learning relevant and meaningful. When students see the real-world application of what they are learning, they are more likely to remember it. The emotional connection formed during the process of creating something also helps cement the knowledge in long-term memory.
📖 Reference Links
- Edutopia: Maker Education Resources
- Make Magazine: Make:
- MakerEd: MakerEd Resource Library
- Teach Writing: Writing Makerspaces: 4 Ways to Apply the Maker Movement to your …
- New York Hall of Science: A Blueprint: Maker Programs for Youth
- Seymour Papert: Constructionism
- Creality: Official Website
- LEGO Education: Official Website
- Makey Makey: Official Website